A CCTV export can play correctly and still be difficult to interpret. The missing piece is often not the video file itself, but the recorder configuration that explains how the material was created. Frame rate, image size, recording schedule, motion triggers, storage behaviour and system time can all affect what is present in the recording and what is absent.
Before opening the export menu, create a clear record of the digital video recorder (DVR) or network video recorder (NVR) as it was found. A DVR normally records digitised signals from analogue cameras, while an NVR stores digital streams from IP cameras. The menus differ between manufacturers, but the documentation task is the same: capture enough context for another technician to understand the system without having to stand in front of it.
The current SWGDE guidance for acquiring data from digital video recorders recommends keeping notes and, where useful, photographs or a recording of the system and its settings. It identifies recorder identity, connected cameras, system time, storage, overwrite behaviour, image quality, frame rate, recorded image size, trigger settings, firmware and logs as details worth documenting. The practical method below turns that list into a repeatable pre-export workflow.
Why recorder settings matter even when the video plays
Recorder settings describe the conditions under which video was stored. A low frame rate may explain why fast movement appears in large jumps. A small recorded image size may explain why a face or registration plate contains too few pixels for useful examination. Motion-triggered recording may explain gaps before or after an event. Overwrite settings help establish how quickly older recordings are replaced.
These settings are context, not a promise that the system behaved perfectly. The configuration visible today may have changed since the relevant recording was made, and different cameras can use different profiles. Record what the system shows, note any uncertainty, and use logs or recorded-file properties when they are available. Avoid wording such as “the camera recorded at 25 fps” when all you have observed is a current menu setting. A more accurate statement is “the recorder displayed a 25 fps setting for Channel 4 at the time of collection.”
Changing a setting cannot improve video that has already been recorded. It can, however, change future recordings or make the original configuration harder to reconstruct. Document first. Only make a temporary change when it is genuinely necessary for access or export, and record the original value, the reason for the change and the restored value.
Record the system as found
Begin with the recorder identity and access route. Record make, model, serial number, system type, firmware, and the number of available and connected channels. For a video management system (VMS), identify the relevant server, software version and storage location. Note the permission level used because restricted accounts may hide settings or logs; handle operational passwords separately through a secure procedure.
Use notes and photographs together. Capture the full menu page to preserve its path, selected channel and labels, then take a readable close view of the values. A photograph showing only the number “15” has little value if it is unclear whether it means frames per second, days of retention or a channel number.
Document settings in a repeatable order
1. System time, time zone and synchronisation
Photograph the recorder’s date and time beside a reliable reference, calculate whether it is ahead or behind, and record the time zone, daylight-saving setting and network time protocol (NTP) configuration where shown. NTP synchronises clocks across a network. Do not correct the clock before searching or exporting. On an IP system, compare the timestamp in recorded video with the recorder menu because cameras and servers may use different clocks.
2. Cameras, channels and stream selection
Record the recorder’s camera capacity, the connected cameras and the mapping between physical views and channel names. Do not assume labels such as Entrance or Camera 06 are accurate. For an NVR, also note whether the relevant channel records a main stream or a lower-quality substream. A stream is the encoded video sent by an IP camera, and the selected stream can affect recorded detail.
3. Recording mode, schedule and event triggers
Document whether each relevant channel records continuously, on a schedule, after motion or alarm triggers, or through a combination of modes. Capture the weekly schedule, exceptions, motion grid, sensitivity and any pre-event or post-event duration. Pre-event recording keeps a short period from before a trigger; post-event recording continues afterwards. These settings can help explain late starts, early endings or gaps, although they do not prove exactly how the system behaved at a particular moment.
4. Resolution, frame rate, quality and compression
For each relevant channel, record resolution, frame rate, quality, bitrate control and codec where shown. Resolution is the picture size in pixels; frame rate is the number of frames recorded each second; bitrate is the amount of data used over time; and a codec such as H.264 or H.265 encodes and decodes the stream. The SWGDE technical overview of digital video files explains how these parameters influence detail, motion and compression artefacts. Do not change them to improve existing footage: a new setting only affects future encoding or a derivative copy.
5. Storage, retention and overwrite behaviour
Record total storage capacity, used or free space, the earliest available recording, any retention estimate and whether the recorder overwrites the oldest material or stops when full. Include scheduled deletion or reset rules when visible. Treat a displayed retention period as an estimate: activity, bitrate, frame rate, resolution, audio and the number of active channels all affect how quickly storage is consumed.
6. Audio, privacy masks and image-processing options
Record whether microphones are connected and audio is enabled. Note relevant privacy masks, dewarping, stabilisation or camera-side controls such as exposure, wide dynamic range and infrared mode when they can affect the recording. A privacy mask hides part of the image, while dewarping converts a fisheye view into a conventional perspective. Keep the work proportionate: document settings that explain the material rather than copying every configuration page.
7. Firmware, health information and logs
Capture the firmware version and any health page showing disk status, camera disconnections or recording errors. Logs may record access, configuration changes, restarts, storage faults and outages. Export relevant logs where possible, or photograph entries with the date range and filter visible. Treat them as supporting context: an empty log does not prove that nothing changed, and current firmware does not establish the historical version.
8. Export choices and destination
Before export, document the selected cameras, start and end times, file format, audio option, destination, and any option to include a player or codec. A native or proprietary format is designed for the recorder’s own software and may preserve information that a common format does not. Where practical, retain it with the required player. Also record the USB port or network route, created filenames and completion message so the resulting files can be connected to the source and selection.
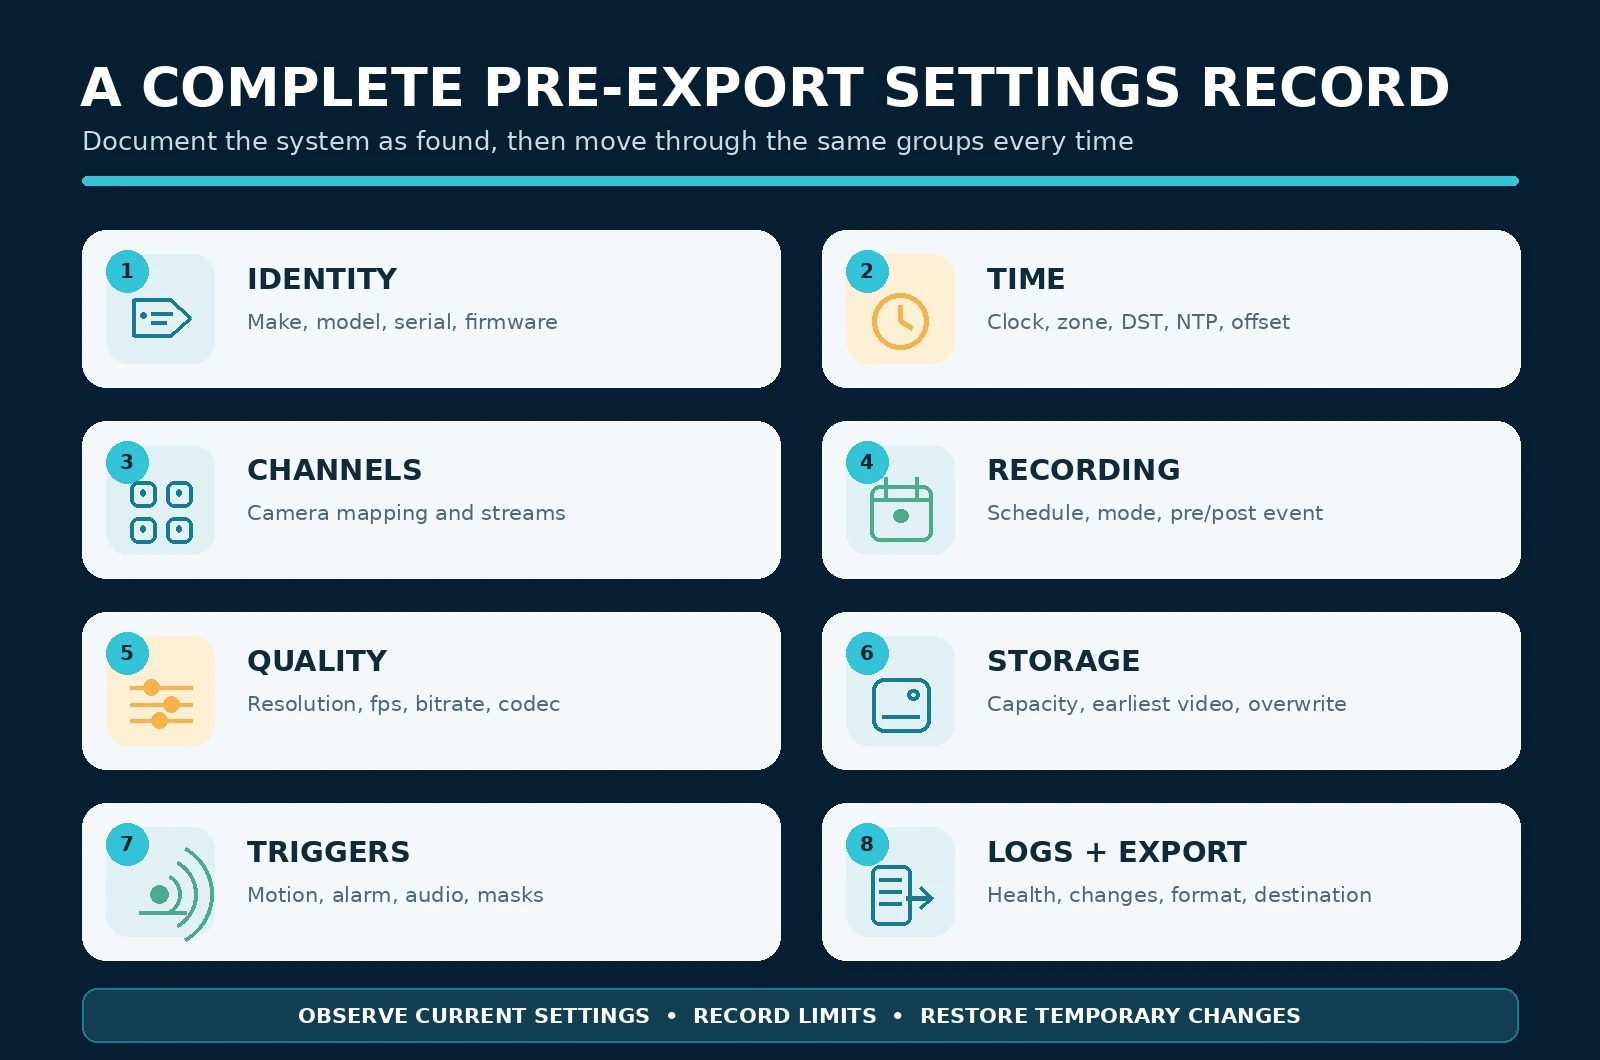
Photographs and notes must remain interpretable
Keep a visible sequence from recorder identity through time, camera mapping, recording, quality, storage, triggers and export. Include the menu breadcrumb and selected camera. Use descriptive notes or filenames such as “NVR-A_CH04_recording-settings_2026-07-27”, and review images immediately because glare or moiré patterns can make monitor text unreadable.
The CCTV Collector workflow follows that field sequence, while its structured system, photo and reporting features keep settings, time verification and photographs with the rest of the acquisition record instead of leaving them as an unlabelled group of images.
Do not confuse present settings with historical configuration
The most common reporting error is to turn a present observation into a historical claim. A schedule photographed today may not be the schedule that applied six weeks ago. A firmware update may have changed menu defaults. A camera may have been replaced while retaining the same channel name.
Where historical configuration matters, look for dated logs, configuration backups, maintenance records or properties in the exported files. If none are available, say so. Clear limits make the documentation stronger: “Current settings were recorded on 27 July 2026; the system did not provide a dated configuration history” is precise and useful.
A practical pre-export settings record
Before leaving the settings menus, confirm that the record contains the following:
- Recorder or server make, model, serial number, firmware and access level.
- System date and time, reference time, calculated offset, time zone and synchronisation method.
- Relevant camera-to-channel mapping, recording status and main-stream or substream selection where applicable.
- Recording mode, weekly schedule, motion or alarm triggers, and pre-event or post-event values.
- Resolution, frame rate, quality, bitrate or compression settings for each relevant channel.
- Storage capacity, used space, earliest available recording, retention estimate and overwrite behaviour.
- Audio status and any relevant privacy mask or image-processing setting.
- System-health information, disk warnings, camera outages and relevant logs.
- Export cameras, time range, format, audio choice, player or codec option, and destination.
- A record of every temporary change and confirmation that the original setting was restored.
Restore the system and verify the export
After the files have been created, verify that they open on a separate computer and that the expected cameras, dates and times are present. Collect any proprietary player or codec needed for playback. If temporary media was used, transfer the files to the intended storage location under the normal integrity procedure.
Return the recorder to its original state. Re-enable any monitor, network connection or setting that was temporarily changed, unless the responsible system owner has directed otherwise. Photograph or note the restored state. The SWGDE guidance on maintaining imagery integrity supports using documentation and verification together so that later users can understand the origin and handling of the material.
A documented configuration makes the export explainable
Documenting DVR and NVR settings is part of the technical work. A selective, readable record explains what the system was configured to capture, how it managed storage and how the export was produced. Capture the system as found, follow the same settings groups each time, avoid unnecessary changes and distinguish present observations from historical facts.